Introduction
Picture this: A critical client email gets flagged as junk. Your internal alert system, silenced by spam filters. These aren’t just minor annoyances—they’re disruptions that can impact operations, SLAs, and even revenue. For IT teams, ensuring reliable email delivery is non-negotiable. That’s where Safe Senders List come in—an often overlooked but powerful tool in your email hygiene arsenal.
Why Safe Senders Matter More Than Ever
In today’s enterprise environments, email remains the primary mode of communication—and a top vector for phishing. Balancing protection with usability is a constant struggle. Tools like Microsoft Defender for Office 365 provide advanced threat protection, but they can be aggressive.
That’s where the safe sender’s list steps in. It allows you to explicitly trust email addresses or domains, ensuring they bypass filters and land in inboxes.
Without centralised deployment:
- Users manage their own Outlook junk settings (or don’t).
- Important business emails can be mistakenly quarantined.
- IT spends time troubleshooting false positives.
Central deployment brings consistency, control, and compliance.
Deployment Options
You can deploy the Safe Senders list using different methods: Intune, Group Policy, login scripts, and Exchange PowerShell. We’ll cover how to use Exchange PowerShell with the command Set-MailboxJunkEmailConfiguration In more detail, including troubleshooting common errors, in a separate post.
In this post, we will talk about using Intune to configure Outlook to reference the Safe Senders list, which can be located on a shared network drive or locally on users’ machines.
Step-by-Step Guide to Deploying the Safe Senders List
Step 1: Understand Where the Safe Senders List Are Stored
Outlook stores safe sender lists in each user’s mailbox or profile, not in a central registry key.
- Open Outlook
- Click Junk > Junk E-mail Options
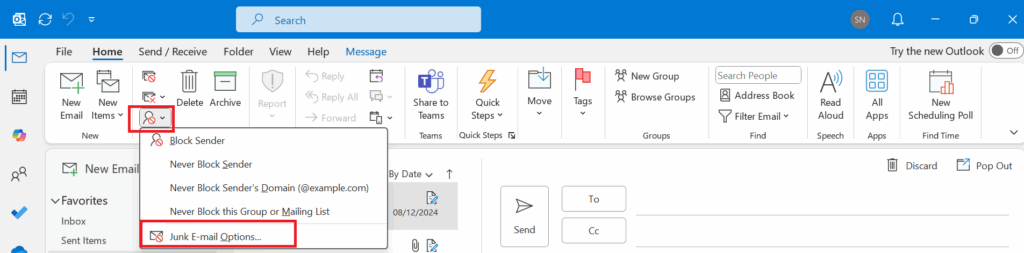
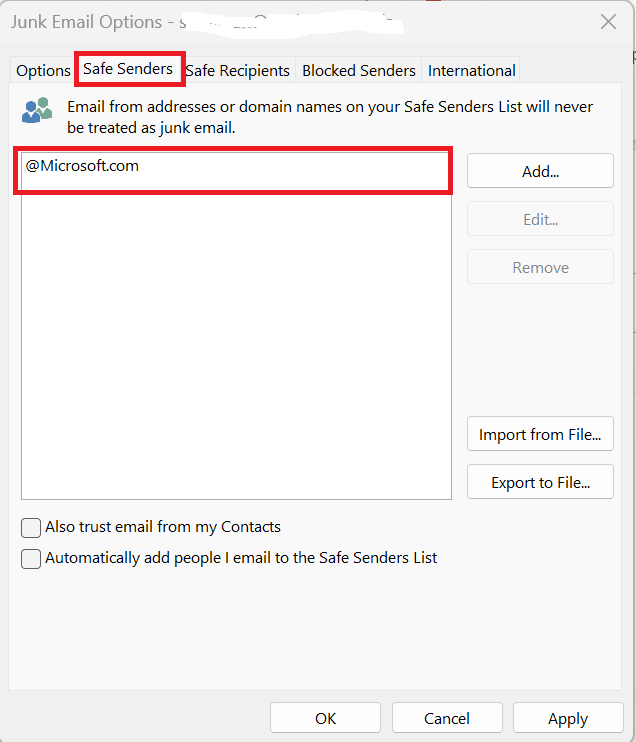
- Click the tab Safe Senders
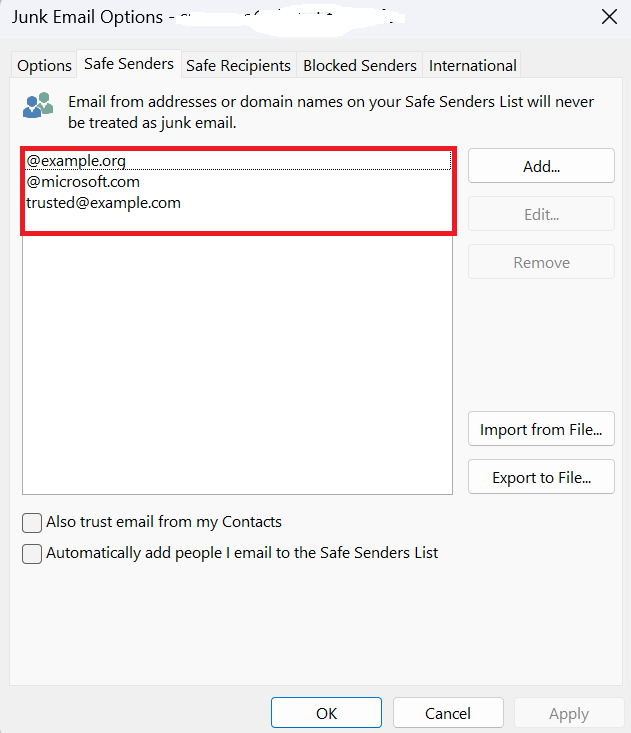
- You can see the list of safe Senders, in my case Microsoft.com Domain is on the list of Safe Senders
Step 2: Prepare the Safe Senders List
This list can be created in a plain text file (.txt) format. Each email address or domain should be written on a separate line. For instance, the following list is saved as SenderSafeList.txt
trusted@example.com
example.org
Once the file is created, you can save it on your local drive (See how you can push Files to users’ devices using the Intune Shortcut Creators tool) or a shared network drive. For this demonstration, I will save it in C:\temp.
| Note: The files that you specify for the policies that control Safe Senders must exist in the specified location when Outlook is started. If the file does not exist in the specified location, Outlook ignores that policy.
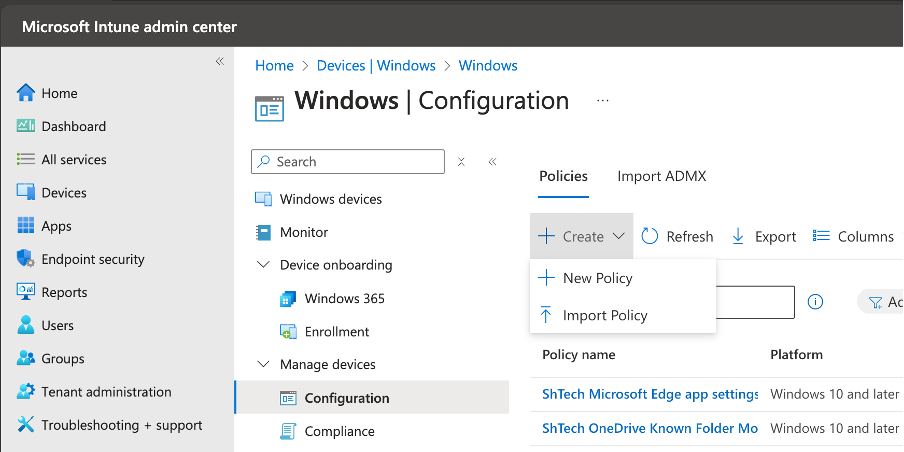
Step 3: Create the configuration policy on Intune
Once the list is prepared, the next step is to enable Specify path to Safe Senders list (User). Here’s how you can do it:
- Access Microsoft Intune: Log in to Microsoft Intune and navigate to: Devices > Windows > Configuration Profiles > Create New Policy.
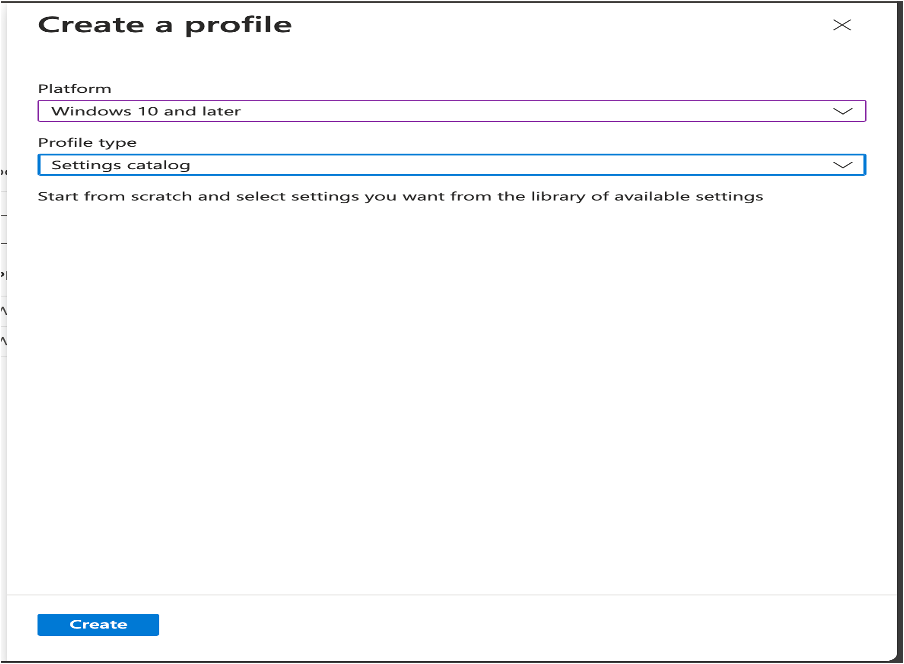
- Create a Profile Platform: Choose Windows 10 and later. Profile Type: Select Settings Catalog
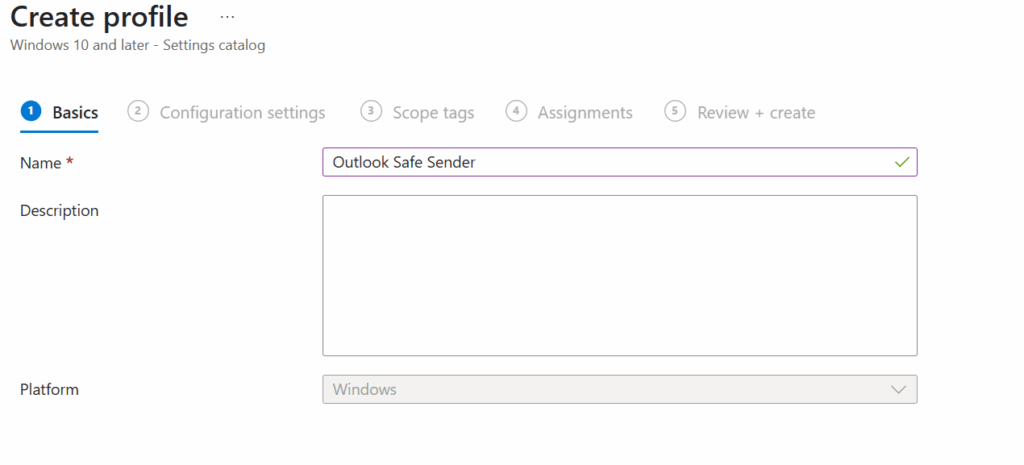
- Name Your Profile: Example: Outlook Safe Sender
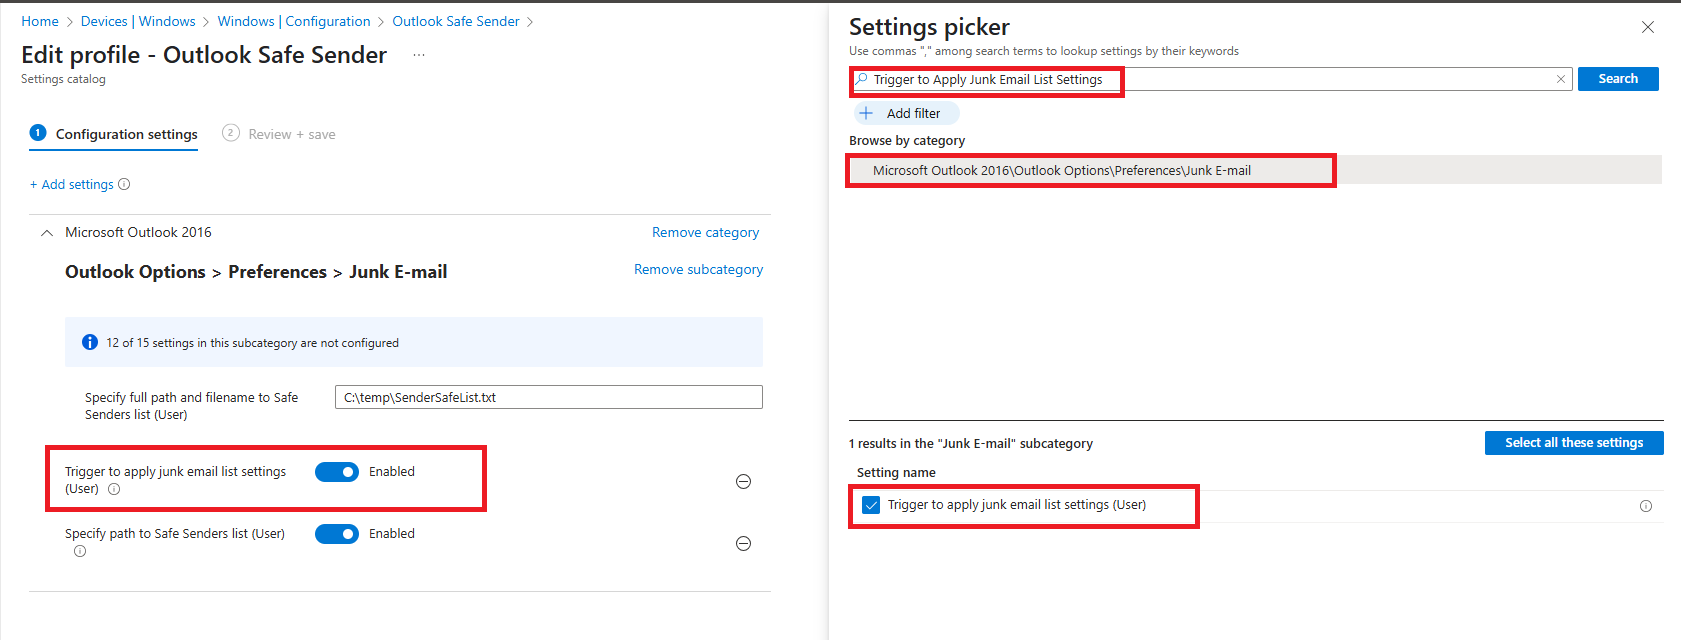
- Set Configuration Options Add settings via the picker: Search for Junk E-mail and select: Specify path to Safe Senders list (User) and set to Enabled. Specify full path and filename to Safe Senders list (user) you created in step 1, e.g: C:\temp\SenderSafeList.txt. Then click Next
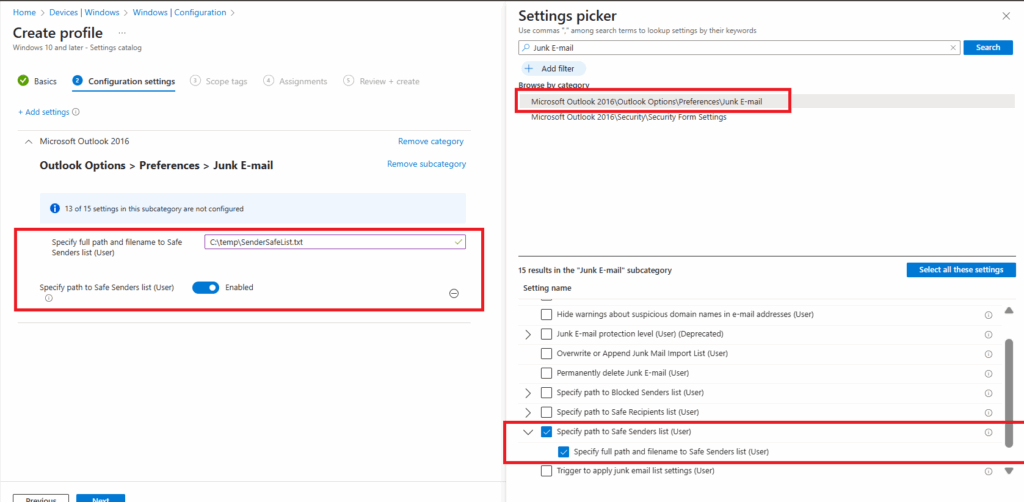
- To apply the policy, ensure the “Junk Mail Import List” policy setting is enabled. Look for Trigger to Apply Junk Email List Settings and select “Enable” for Trigger to Apply Junk Email List Settings (User).
- | Note:
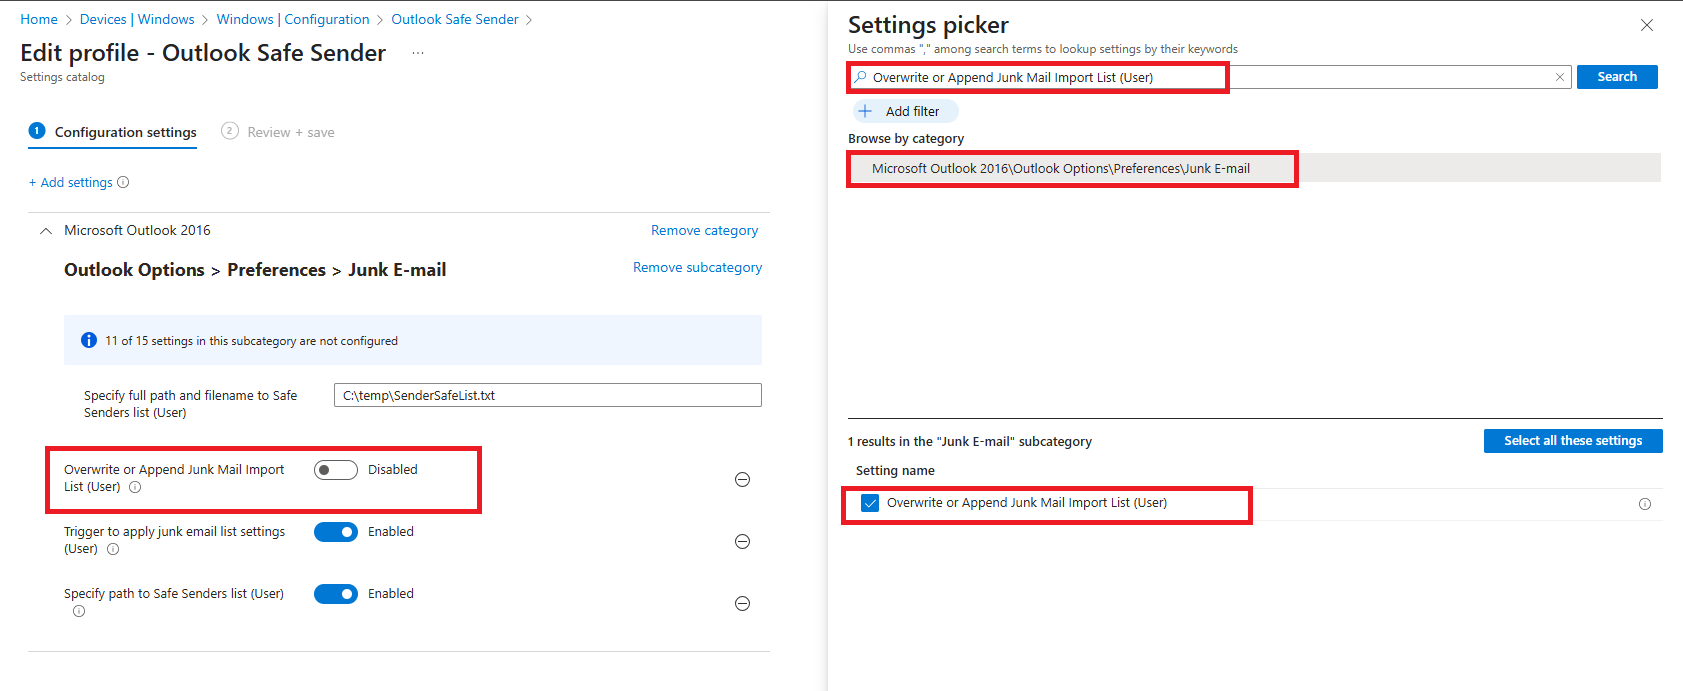
By default, when a new Junk E-mail Filter list is deployed, Outlook appends it to the existing list. If you want to replace the existing list with the new one, add 'Overwrite or Append Junk Mail Import List (User)' to the configuration and set it to 'Enable'. For this demo, we want to append the current list, so we will leave it as 'Disabled'.
- Assign and Deploy: Add scope tags if applicable. Assign the profile to the appropriate devices or groups. Click Review + Create to finalise deployment.
Verifying the Policy
Intune should create the following registry key on the client machines
Computer\HKEY_CURRENT_USER\Software\Policies\Microsoft\office\16.0\outlook\options\mail

DWORD = JunkMailImportLists

Value = 1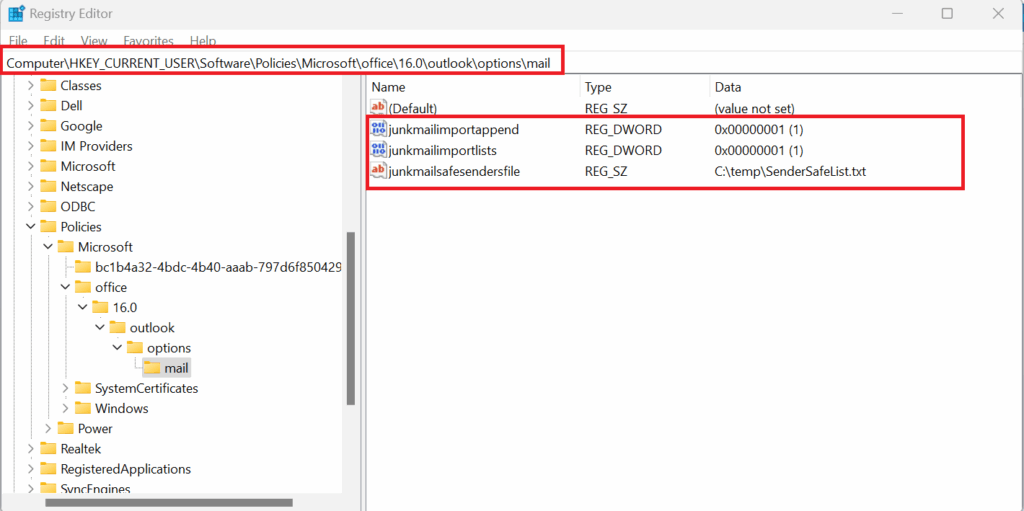
To complete your testing of the policy deployment, launch Outlook and access the Junk E-mail Options dialog box. The screenshot below illustrates two domains deployed via Intune under the Safe Senders tab in Outlook. If a user removes one of these entries and then restarts Outlook, the entry will reappear under the Safe Senders tab as long as the policy enforcing the safe senders list remains active. Users still have the ability to manually add or remove entries from the Safe Senders tab in Outlook, even when these lists are deployed through Intune.
| Note: If a user adds a new entry to the Safe Senders tabs in Outlook, the item will be removed if you are deploying the items for that tab by using Intune and if you also enable the Overwrite or Append Junk Mail Import policy. By enabling this policy, you force Outlook to overwrite items on the tab with the items that are specified in the list from the corresponding policy.

If you want to preserve entries that are manually added by users, configure the Overwrite or Append Junk Mail Import policy to Disabled. By doing this, you force Outlook to use the default append mode for lists that are deployed by policy.
Best Practices for Managing Safe Senders List
To ensure the effectiveness of your Safe Senders list, consider the following best practices:
- Regular updates: Regularly update the list to include new trusted senders and remove obsolete ones.
- User feedback: Encourage users to report any issues with emails being marked as spam incorrectly.
- Security reviews: Periodically review the list to ensure that it does not include any compromised or suspicious domains.
Conclusion
Centrally deploying the Safe Senders list using Intune is a powerful way to enhance email security and efficiency within your organization. By following the steps outlined in this guide, you can ensure that your users receive important emails without them being marked as spam. Remember to regularly update the list and monitor its effectiveness to maintain a secure email environment.
Have you tried deploying the Safe Senders list using Intune? Share your experiences and tips in the comments below! If you found this guide helpful, don’t forget to subscribe to our newsletter for more insights and updates on email security and device management.